MIDI Keyboard MACROS
Script

Windows 7,8,10 (5MB)

USE YOUR MIDI DEVICES
IN ANY APPLICATION

INTRODUCTORY
OFFER
Version 2.30


MIDI Keyboard Macros use the same BASIC Script language as Multi-Keyboard Macros
We will skip all the introduction that you can read in the Multi-Keyboard Macros. Don’t forget to check the PDF manual that has a very detailed description of
every function in the script.
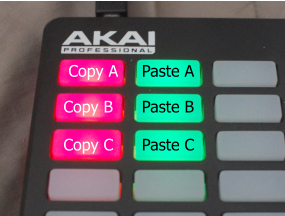
Project 1 Triple text clipboard.
Let’s have Copy A B C and Paste A B C instead of standard Copy/Paste. As a programmer I always wanted this functionality as I need to have few more things
in clipboard at the same time.
I am going to use AKAI APC mini. It is inexpensive and has a huge amount of buttons and sliders to use. The downside is that the pads are not touch sensitive,
so we can’t use the clever Light Touch option (when you brush lightly over the keys, they will only display the name on screen but not trigger the macro) but
we can use the Set Color options as a visual clue. On APC Mini the color 3 is red and color 1 is green.
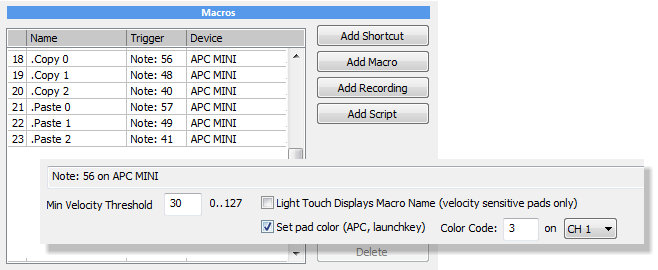
// increase this number for each new clipboard
#define CLIPBOARD 0
SendKeyStroke("CTRL C")
SendKeyStroke("PAUSE")
// get the new clipboard
GLB_MClipboard[CLIPBOARD] = GetClipboardText()
DisplayText("Copy to Clipboard " + CHAR(ASC('A')+CLIPBOARD))
The Copy buttons are simple:
The only difference is that on each next copy button we increase the value of the #define line, so the next button will be #define CLIPBOARD 1 etc…
What the script does is to send CTRL C to the window, then wait a little for the windows clipboard to get updated. Then put the clipboard into a global array
variable GLB_MClipboard[] and also display text on screen. The CHAR(ASC('A')+CLIPBOARD) simply converts the CLIPBOARD number into A, B, C…
letters.
The Paste buttons:
// increase this number for each new clipboard
#define CLIPBOARD 0
if TYPE(GLB_MClipboard[CLIPBOARD])>0 then
SetClipboardText(GLB_MClipboard[CLIPBOARD])
SendKeyStroke("CTRL V")
DisplayText("Paste " + CHAR(ASC('A')+CLIPBOARD))
else
DisplayText("Clipboard "+ CHAR(ASC('A')+CLIPBOARD)+ " is <empty>")
endif
Same as previously, for each paste key increase the number in #define
The first line checks if the if our global array exist (because we may press PASTE before we ever press COPY).
TYPE( ) returns the type of variable inside and if it is -1 that means it has not yet been defined. But if it has been defined, that means it has some text in it.
We will send the the content of the array item to the clipboard, send CTRL V to the window and display little text on screen.
If it has not been defined we only display on screen that the clipboard is empty.
Project 2: Use APC MINI slider to select Photoshop Tool
There is a one difference with MIDI Keyboard Macro script - because MIDI device can transmit velocity and control data value, a variable MIDIvalue
carries the velocity and slider/knobs control values (0..127) in the script and variable MIDInote has value of the currently pressed note (or CC)
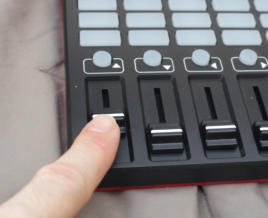
Photoshop tools are recalled with simply sending a keyboard press such as V for Move Tool, B for Brush
etc… we can surely use few of the numerous APC MINI buttons or we can try to be more clever and utilise
the slider.
if MIDIvalue<30 then
SendKeyStroke("V")
else
if MIDIvalue<60 then
SendKeyStroke("B")
else
//etc...
endif
endif
While it would work, it isn’t very elegant, nor very expandable and the if-endif lines are just
amateurish - and we are all PROs here, right?
In the Script we have an extensive support for arrays. So it would be pity not to use them. Here is a second listing with improved idea:
name[0] = "Move"
keystroke[0] = "V"
name[1] = "Laso"
keystroke[1] = "L"
name[2] = "Brush"
keystroke[2] = "B"
nstep = INT(127/3)
item = MIDIvalue/nstep
DisplayText(name[item])
SendKeyStroke(keystroke[item])
This second version is already much better. We have two arrays: name and keystroke and it will select the array item depending on the MIDIvalue
On the listing above the slider works the opposite way than we defined the keys - the Move would be on the slider bottom and the Brush would be on the slider
top (the other way than it appears on Photoshop toolbar).
The fix would be to replace the line with:
item = (127-MIDIvalue)/nstep
Let’s refine the script further.
There is a cleaner, less wordy way to fill up the arrays, using Tokenize. Tokenize command extract a certain token from a string using a delimiter.
The syntax is
Tokenize(string,delimiter,skip)
// lazy way of adding arrays
str = "Move,Marque,Laso,Crop,Brush,Clone"
keys = "V,M,L,C,B,S"
name[] = Tokenize(str,",",REFERENCE)
keystroke[] = Tokenize(keys,",",REFERENCE)
// how many items we have?
nMax = LAST(name[])+1
// what is the slider step per item?
nstep = INT(127/nMax)
// reverse so it goes from top to bottom
item = (127-MIDIvalue)/nstep
DisplayText(name[item])
SendKeyStroke(keystroke[item])
So if we have string "one,two" the "," is delimiter. The skip parameter tells us how many tokens to skip so we can extract only particular token.
However if the skip parameter is -1 (or REFERENCE) then it will extract ALL the tokens and send them to a string array - and that is what we are
going to use.
Instead of making it hard-coded how many items we have, we can just ask the string array how many items it has, by using LAST(array[item])
statement. The LAST statement returns the last defined item number - in our case it would be 5 because we have 6 items and they start with index 0,
so we need to increase it by one to have space on our slider for all the items.
The final version of the script:
Similarly we can define other sliders with few different Photoshop Tools. Don’t forget to put a dot in front of the Macro Name so it will not display the
macro name just before it displays the Tool name. In fact the app will put one for you if it see you used DisplayText in script.
The basic idea can be very simple
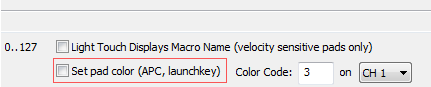
Enable/Disable slider
Sometimes it may be good idea to simply disable sliders to avoid random keystrokes if you are not using it. In our case of
photoshop tools, touching the slider would type letters v,b,m etc.. which is definitely not good if we are in text editing application
and touch the slider by accident.
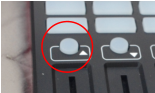
On the APC MINI there are buttons above each of the slider that are just begging to be used for that function.
We will use the newly added SendMIDI command to light up the button depending on the status
So first uncheck Set pad color because we don’t want it to be set automatically.
GLB_PhslEnable = !GLB_PhslEnable
if GLB_PhslEnable then
SendMIDI(NOTE_ON,1,MIDInote,3)
else
SendMIDI(NOTE_ON,1,MIDInote,0)
endif
The script on the round button:
The global variable GLB_PhslEnable will be used to track the status if the button is enabled or disabled. Each pressing of the button will flip the
status (first line - that’s what the ! does). The rest of the lines will light up the current button or switch the light off. The variable MIDInote carries the
actual MIDI number of the trigger button. The color values (3 = RED) are relevant to the APC Mini, other devices may use different values.
Now we need to update the slider script to react to the global variable.
Put this on the very beginning of the slider script:
if GLB_PhslEnable==0 then
terminate
endif
Now the slider will be functional only when the button above it is lighted up.
Note: With SendMIDI you may light up any other buttons, not just the current trigger. In that case use Monitor window and see the key number of the
button you want to change. Then use that instead of MIDInote
SendMIDI(NOTE_ON,1, 48,3)
This will set the key 48 to red, regardless from which script it is called. Try this on first example as an exercise (triple copy/paste). When you press any
copy button, set it to blinking (on APC MINI, red blink is 4) - or some other color while set all other Copy buttons to solid red. The blink will then
indicate which copy button was used last.
Tips for working with web pages:
Web pages can be easily parsed from within the Script, but first we need to get the source code to the clipboard.
This following example is for FIREFOX, google chrome may have different shortkeys
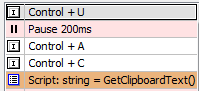
CTRL+U opens source code in new tab
Pause because it may take a bit time for firefox
CTRL+A - select all text
CTRL+C - send it to clipboard
<< now the script takes over
string = GetClipboardText()
n = Find(string,"<div class=\"main-news\">")
title = Mid(string,n+22,100)
title = Extract(title,"<h1>","</h1>",0)
Example of parsing the web page:
Example of extracting exe file link (works for example on this page)
string = GetClipboardText()
// Test for .exe” which will get the exe in link such as
// href=”http://www.mediachance.com/something.exe”
n = Find(string,".exe\"")
if n<1 then
DisplayText("Error, No link Found")
terminate
endif
// get text from beginning to just after the .exe”
string = Left(string,n+5)
// Find the closest href= to the end
n = ReverseFind(string,"href=")
// Get the string from the end of href= to the end
string = Mid(string,n+5,0)
// Replace “ with nothing
link = Replace(string,"\"","")
SetClipboardText(link)
// Move cursor to address box, paste the link and press Enter
SendKeyStroke("CTRL L")
SendKeyStroke("PAUSE")
SendKeyStroke("CTRL V")
SendKeyStroke("ENTER")
// Move cursor to address box.
SendKeyStroke("CTRL L")
// copy the address bar link to clipboard
SendKeyStroke("PAUSE")
SendKeyStroke("CTRL A")
SendKeyStroke("CTRL C")
// Send Esc to close address bar…
// oops, in version before 2.04 there is no ESC in SendKeyStroke and you need to use SendKeyStroke(“0x1B”)
SendKeyStroke("ESC")
string = GetClipboardText()
DisplayText(string)
Example of extracting link from address bar of firefox
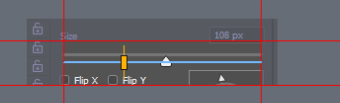
Using Slider Helper (v2.10 and above) to move actual on-screen slider
Slider commands allow moving on-screen slider using script commands. To setup Slider use Slider Helper in the Script Editor to set DefineSlider
arguments from host application.
// MIDIvalue is in range 0...127 we remap it to 0..100
velocity = (MIDIvalue/127.0)*100.0
nBrushSize = DefineSlider(1870,392,198,74)
SetSliderPos(nBrushSize,velocity)
The rest of the script is very simple - we remap the control value from 0…127 to 0…100 and pass it to SetSliderPos. That’s all.


Get Updates


About MediaChance
Products
Links