|
Crop |
  
|
|
Crop |
|
Cropping is an essential tool for any photographer. Even the images you get from a photo-lab are cropped (the photo shows less than the film you exposed), and if you look at the new Advanced Photo System (Advantix) then each size Classic, HDTV or Panoramic is nothing other than a different crop from the original film image. Sad, but true.
Photo-Brush has normal Crop and Proportional Crop. With normal Crop you can draw a Cropping rectangle any size on the original image. If you double click on the cropping area, the image will be cropped to the desired size.
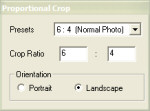
Proportional Crop goes further. While you are editing digital images, it is often necessary to create a compatible format with, for example, your photo-album. If you print an image from your digital camera and then try to put it in your photo album, you may notice that the camera has a different width/height ratio than a normal photographic film format so you need to crop your digital images in a predefined ratio; for example (7:5 or 6:4 which is a standard photo ratio)
When you use Proportional Crop - no matter how large you draw the crop rectangle, the specified ratio will remain the same.
You specify the orientation as Portrait or Landscape. Portrait will always have the larger number assigned to the Height and Landscape to the Width. (So it is the same if you use 7:5 or 5:7, Landscape will always be Landscape)
Proportional crop uses a relative ratio. That means it is the same if you use centimeters or inches; it doesn't specify the physical size!
How to use it in real life.
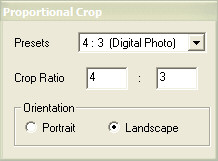
Example: We would like to make a print in a standard photo size of 6 x 4 inches for our photo album. The image from the digital camera is not in this ratio (it is, in fact, 4:3). We also need to crop, using only part of the image...
|
|
|
|
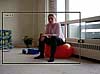
Our original image. The image is from a digital camera, so it has different w/h ratio than a photographic album. |
We need 6x4 inch output so we simply type (or select from menu) 6 and 4. Select Landscape. At this point it doesn't matter if it is in inches, since we just need to keep the ratio. |
Now draw the cropping rectangle around the part you wish to save. It will keep the 6:4 ratio. You can always resize it later - and it will keep the same ratio. |
Double-click on it to finish the crop. The image has the desired 6:4 ratio. Now we need to print it as an exact size 6x4 inch image! |
To print, we can save it in JPG format and load it into any reasonable photo print tool, which probably came with your ink jet printer. If you have no special tool for printing photographs then you can print it from Photo-Brush:
First you need to Set print size - from menu File.
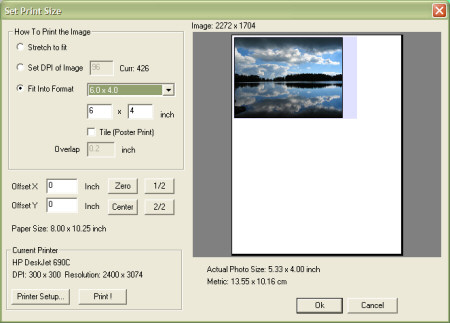
Now is the perfect time to talk about the exact size (in inches) since we are going to make a physical print out!
Use Fit into Format and specify 6 x 4 inch. The blue rectangle (desired size) and the red rectangle (available image) will overlap - which is why we were doing all this - to have the image in an exact 6 x 4 inch size.
Now use the Set button and then Print!
While this may seem complicated, the Proportional Crop is a great helper function for many specific tasks.
Why we use relative coordinates (ratio) and not absolute (inch) directly?
If you are editing your images on a computer, then the only absolute value is in pixels. Setting real size (in inches) has no meaning yet. If you make an image 640 x 480, then it may show in different sizes (in inches) on different monitors and different resolutions - but it will always be 640 x 480.
The inches are important only when you going to print. Here is why we need inches: We want to have a printout in an absolute size - and once it is printed, it will always stay that size, right?
DPI?
DPI means “dots per inch.” Since computer monitors don't understand DPI, you may set your image to whatever DPI you are comfortable with, and it will always shows in its pixel size on your monitor. (for example, on a web page) The DPI is important only if you going to print.
What is even more confusing is that the DPI of the digital image is never the same as the DPI of your printer!
Example: You are going to scan an image 6x4 and then print. You may be tempted to scan it in 1400 DPI, because that is a resolution that your printer has. But that's wrong!
One pixel on your scanned image can have millions of colors (exactly 255*255*255), but one pixel produced by a printer can have only one from 3 (or six). It doesn't look like that on the printer output because these dots are tiny and they are printed in a diffusion pattern. From a distance they look like a solid color to us - but use a magnifying lens!
Instead we can scan our photo in 300 DPI and it would look just fine on the printer.
So what does the 300 DPI then tell me? If we divide the number of pixels in width and height by the DPI, we would know what the original width and height in inches of the scanned material was. That may be nice for some scans, but it is worthless for digital cameras. What would the DPI from a digital camera tell me? That the CCD chip size was 0.4 x 0.4 inch? That's definitely not the size we would like to print back!
There is a lot of confusion around DPI, and most of the time it doesn't tell you anything useful. It is essential when you are planning a print job (and you also need to know the parameters of your printer). It is simply best to avoid thinking in DPI and stick with PIXEL size instead.
The equation is very easy: more pixels - better quality and you can make a larger printout.
But you never know how large until you try it on your printer! All printers have different quality and behave differently...No numbers will give you a truthful indication of output until you actually try it.