|
Selections |
  
|
|
Selections |
|
Photo-Brush, as other image editing tools, features wide range of image Selection tools including several unique and very uncommon tools and techniques, which improve the selection workflow and make the boring selection work easier and more fun.
The biggest advantage of Photo-Brush, over similar photo editors, is the ability to change the selection parameters even during drawing the selection! In other programs, you have to stop making selection, discard what you did, and start the selection again with new parameters. Not so in Photo-Brush! In Phot-Brush, you can change the merging operation (add, subtract, etc..), rotate the selection, or change some other selection parameters "on fly" with several selection shortcuts. All available shortcuts are described later in this chapter. You can control almost every aspect of selections via shortcuts. However, using mouse and/or tablet pen is still the main (and only) way how to define the selection area.
Photo-Brush selection tools are not only variable, but they are also very fast and usable also on 10+ Mpix images, without burning your computer! When we designed Photo-Brush selections, we noticed that some other image editing applications utilize CPU even if the mouse with enabled selection tool is inactive! This is not very nice behavior, but at least, you can warm yourself from heating of the computer fans. So Photo-Brush did it the other way ;)
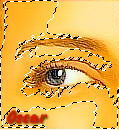
Probably the best feature in Photo-Brush selections (and which we are really proud of) is the Live-Preview of Magic Wand selection! With this feature, you just can see what are you going to select, without the need to re-pick the selection again and again! Just start the Magic Wand selection and, instead of simple click inside the picture, do click and drag over the image! The suggested selection is then highlighted by false colors. The area of selection changes according to the actual mouse position and defined color/channel/brightness tolerance.
Also, this Live-Preview feature is very fast, but of course, it slows down on large pictures (5Mpix +), especially with large amount of selected details (too high tolerance value) and the CPU usage is also higher. But, considering how much data the Magic Wand have to check and process, it's still very fast and responsive tool.
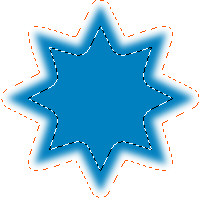
Another very useful selection feature is Feather. Feather is a very common selection feature in most graphics editors. However, in PhotoBrush you can see how the Feather will affect your selection (both the border of selection and Feather). You can define and modify the amount of Feather before and after applying the selection. In other words, you can freely change the level of Feather while the selection marquee is active.
In the following table you can see how the different levels of Feather affects sharpness/smoothness of the "fill bucket" tool applied inside the selection. It's not very useful example, but it should give you a good impression how to smooth out the jagged edges...
|
|
|
|
|
|
300% zoom |
300% zoom |
|
|
|
|
|
|
300% zoom |
300% zoom |
OK, enough about Selection gimmicks, back to work...
We believe that creating selection is a very common and widely know operation, so there is no need of detailed "how-to-make-a-selection" tutorial. However, here are some quick steps how to create and use selection in Photo-Brush.
At first, you have to start the selection tool either by clicking the selection button ![]() in main toolbar or by pressing "S" shortcut.
in main toolbar or by pressing "S" shortcut.
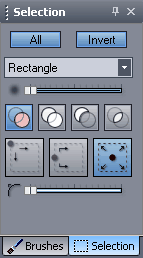
This will start the Selection tool and activate the Selection pane with detailed Selection options, as shown here..
Remember that the Selection can be started only if there is an image loaded in the workspace! Without image in workspace, the selection will be activated, but because there is nothing to select from, you will have to load/paste something into the workspace!
Now you can select the selection tool and operation (from the above Selection pane) and, of course, change the Selection parameters available for a given selection tool. Finally, you can draw the selection. As pointed previously, most of the selection parameters (like magic wand tolerance, rounding angle for rectangle selection, feather or number of star spikes) can be changed even during drawing the selection!
For example, let's say you use the Magic Wand tool. With its Live-Preview you can perfectly see what will be selected after releasing the mouse. But in some cases, no matter in what direction you move the mouse, the area of selected pixels is too large or too small. In other programs, you would have to skip the selection, change the selection tolerance and draw new one. Not so in PhotoBrush! While you still hold the mouse (still in Magic Wand selection mode), simply press the left/right arrow key and see what will happen. Right arrow will increase the are of selected pixels (higher tolerance), Left arrow will decrease the number of selected pixels (lower tolerance). In the following flash animation you can see how it works.
If you are happy with the result you immediately apply the image adjustment effects on that selection or paint inside the selection. In case of complicated selections, we would recommend you to save the created selection marquee on to HDD. Just go to the menu Selection and here choose Save Selection ![]() tool. You can load the saved selection anytime later with Load Selection
tool. You can load the saved selection anytime later with Load Selection ![]() . It's very useful option in case of complicated selections and selections which you want to use multiple times with different images.
. It's very useful option in case of complicated selections and selections which you want to use multiple times with different images.
If you wish to copy and paste the selected portion of the image, you have turn the selection into a floater. This can be done either by right clicking anywhere inside the workspace or using Turn the selection to the Floater button ![]() , which can be found right next to Start the Selection tool button
, which can be found right next to Start the Selection tool button ![]() in main toolbar. This will turn the current selection into the Floater, which can be moved across the workspace, copied, or cut out of the image and placed in another project or program.
in main toolbar. This will turn the current selection into the Floater, which can be moved across the workspace, copied, or cut out of the image and placed in another project or program.
As Photo-Brush does not yet support layers (we promise it will in next release!;), this Floater thingy represents something like additional "Layer", which floats above the basic layer. If you want to discard the Floater, you can do it by pressing <Esc> or right clicking inside the project and select Cancel Floater from the appeared menu.
This is in short how to create selections in Photo-Brush.
As said above, many of selection parameters can be changed "on fly" while you are still dragging the selection. For many people, it is easier and very natural to use shortcuts everywhere they go. And because of extensive shortcut support in Selection tools, you can use shortcuts for almost every selection operation from changing the current merging mode through setting corner roundness to finishing the selection and promoting into the Floater.
Let's say you, for example, start drawing selection with "Add" merging operation and then during drawing new selection you suddenly change your mind and you want to "Subtract" the currently drawn selection, instead of adding it into the existing one. Then simply press "O" to switch to "Subtract" merging operation. You can see the change of actual merging operation in Selection pane.
Or another example.. If you want to change the corner rounding of currently drawn selection Rectangle or for example you want to change the number of spikes of Star selection object, then the only thing you have to do is to keep pressing the Left/Right arrow key (or <Shift> + Left/Right key for Quick Step) during still active selection tool (holding left mouse button down).
And yet another example.. In most image editing programs, you can start adding/subtracting selection to/from existing one by holding a combination of <Ctrl>, <Alt>, or <Shift> key while dragging the mouse with defined selection tool. Photo-Brush offers also this variation of previously described "O" shortcut.
Holding <Shift> + mouse click resets the Merging operation to "Add" ![]() mode. <Alt> + click in contrary sets the "Subtract"
mode. <Alt> + click in contrary sets the "Subtract" ![]() merging operation. Then <Alt> + <Shift> + click changes the merging operation to "Intersect"
merging operation. Then <Alt> + <Shift> + click changes the merging operation to "Intersect" ![]() and finally <Ctrl> + click returns the merging operation back to default "Replace"
and finally <Ctrl> + click returns the merging operation back to default "Replace" ![]() mode.
mode.
Maybe all these shortcuts sound a bit scary and hard to remember, but you can believe us that they are very logical and easy to learn. In fact, most photo editors use the same or very similar selection shortcuts, so if you are familiar with other photo editor and its selection shortcuts, you will quickly adapt also the PhotoBrush shortcuts.
Below you can see a description of all selection tools and their shortcuts...
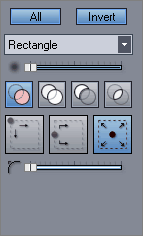
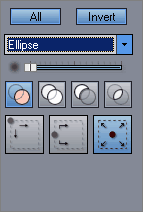
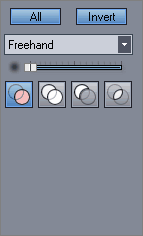
The Photo-Brush Selection Tools Settings |
|
|
Common Selection Settings
Select All button Selects the whole document
Invert button Inverts the actual selection
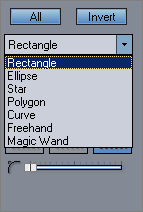
Primitive combo box To specify the type of selection primitive
Feather slider To specify the amount of selection feather
Merging Operation buttons To select the operation for merging a new primitive with the actual selection
|
|
Rectangle Settings
Drawing Mode buttons To specify the interpretation of the point being first clicked when starting to draw a primitive.
Corner Rounding slider To set the rounding of the corners of a rectangle Min = 0 ‰ – sharp rectangle Max = 1000 ‰ – pure ellipse Default = 0 ‰ Quick step = 50 ‰
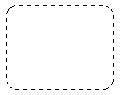
Selection Preview:
|
|
Ellipse Settings
Drawing Mode buttons (as above)
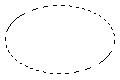
Selection Preview:
|
|
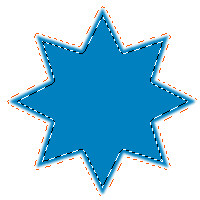
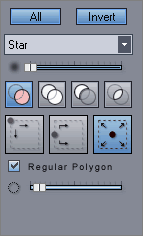
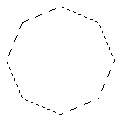
Star (Regular Polygon) Settings
Drawing Mode buttons (as above)
Regular Polygon check box If checked, a regular polygon will be created rather than a star
Spikes Count slider To set the count of the spikes/vertices Min = 3 spikes/vertices Max = 50 spikes/vertices Default = 8 spikes/vertices Quick step = 10 spikes/vertices
Selection Preview:
|
|
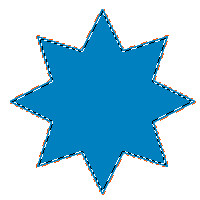
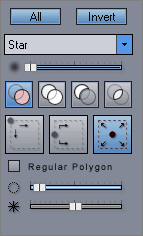
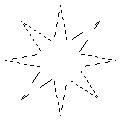
Star (True) Settings
Drawing Mode buttons (as above)
Regular Polygon check box (as above)
Spikes Count slider (as above)
Spike Length slider To set the length of the star spikes Min = 0 ‰ - a regular polygon of a double count of the vertices Max = 1000 ‰ Default = 500 ‰ Quick step = 50 ‰
Selection Preview:
|
|
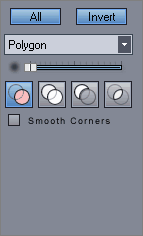
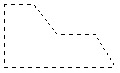
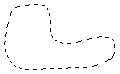
Polygon Settings
Smooth Corners check box If checked, the corners of a polygon will be smooth
Selection Preview:
|
|
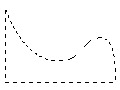
Bezier Curve Settings
No extra parameters are provided
Selection Preview:
|
|
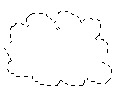
Freehand Curve Settings
No extra parameters are provided
Selection Preview:
|
|
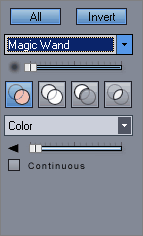
Magic Wand Selection Settings
Channel combo box To specify the channel being taken into account for the Magic Wand selection. Color = all the color component channels (R+G+B) Red = the red component channel Green = the green component channel Blue = the blue component channel Brightness = the maximal value of the color components (R, G, B)
To set the tolerance within which the image values will be marked as selected. A too high tolerance value may lead to a slow-down of the selection because of a high amount of the selected data. Min = 0 Max = 255 Default = 0 Quick step = 10
Selection Preview:
|
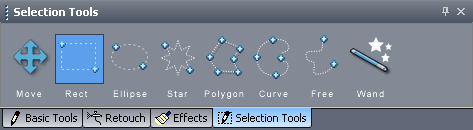
To quick access of selection tool/primitive you can use the Selection Tools pane docked along with Brush tools.
Available Selection Shortcuts
Other than Selection Tool is active |
|
S |
Starts the Selection Tool |
Selection Tool is active (global selection settings) |
|
O |
Sets the next Merging Operation (replace, add, subtract, intersect) |
Alt+O |
Sets the previous Merging Operation |
Right
|
Increments the value of the first slider if present |
Left |
Decrements the value of the first slider if present |
Shift+Right |
Adds the Quick Step value to the value of the first slider if present |
Shift+Left |
Subtracts the Quick Step value from the value of the first slider if present |
Up |
Increments the value of the second slider if present |
Down |
Decrements the value of the second slider if present |
Shift+Up |
Adds the Quick Step value to the value of the second slider if present |
Shift+Down |
Subtracts the Quick Step value from the value of the second slider if present |
ESC or DEL |
Exits the Selection Tool without creating the Floater |
Right Click |
Exits the selection drawing mode and converts the selection into the Floater. |
F |
Increments the value of Feather by 1 (Decrements the value of Feather by 1) |
Shift + F |
Increments the value of Feather by 20 (Decrements the value of Feather by 20) |
+ No primitive is being drawn |
|
Alt + click |
Sets the Subtraction merging operation |
Shift + click |
Sets the Addition merging operation |
Alt + Shift + click |
Sets the Intersection merging operation |
Ctrl + click |
Sets the Replacement merging operation |
Ctrl+I |
Inverts the actual selection |
Ctrl+Shift+S |
Hide/Show the marquee of actual selection. |
P |
Sets the next Primitive Type |
Alt + P |
Sets the previous Primitive Type |
Ctrl+A |
Selects the whole document |
+ A selection primitive is being drawn |
|
Ctrl + drag |
The primitive is being rotated |
Shift + drag |
The primitive is being “squared” (sets equal width and height) |
+ Rectangle, Ellipse, or Star is selected |
|
D |
Sets the next Drawing Mode |
Alt+D |
Sets the previous Drawing Mode |
+ Star is selected |
|
R |
Switches the Regular Polygon check box |
+ Polygon is selected |
|
M |
Switches the Smooth Corners check box |
+ Magic Wand is selected |
|
T |
Switches the Continuous check box |
N |
Sets the next Channel |
Alt + N |
Sets the previous Channel |
* most important selection shortcuts are highlighted by blue color