|
Packages |
  
|
|
Packages |
|
Real-DRAW Advanced
Packages
Package is in fact one of the most important features of Real-DRAW. Understanding it will not only multiply your productivity, but will allow you to create more detailed illustrations, new effects, and much more. Packages are a revolutionary, Real-DRAW own feature.
Generally speaking, Package is the ability to divide a large project into segments, where you can edit each segment (called Package) and its objects separately, in a different view.
| • | The Package itself shows in your main document as a single object which you can transform any way you like - resize, rotate, perspective transform, or add various effects to it such as drop shadow, bevel or lights. These transformations will never change the objects inside, and the objects keep their own transformations and effects. |
| • | Because you can resize the package, it also means that you have the ability to design the contents of a package in a larger view than it appears in your document and create many more details. |
| • | Packaging has many obvious benefits - the system needs less memory and you don't get lost in hundreds of objects, but it has also many hidden benefits. |
| • | The ability to apply additional effects to a package, plus easy transformation, with non-destructive sharpening and the ability to Clone Package, and to create more details. |
| • | It can be used for much more than saving some space, and making editing easier ! |
Packages are a higher form of Groups, and provide you with the ability to create large projects, divide project into logical segments and then apply effects globally to a whole group of objects.
Working with Packages is very transparent to the user.
You can easily create a Package from any group of objects, and even from a single one, with edit Package, update, and Unpack the Package, whenever you need.
Because the Packages open in a separate document you can easily add, copy, or remove objects in-or-out of the package.
Differences between Package and Groups
Both areu sed for grouping objects. However the major difference is when you apply effects or properties to each.
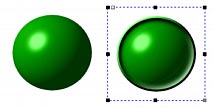
![]() We have two objects, we can either Group them or Package them
We have two objects, we can either Group them or Package them
![]() Here we first Group the objects and then apply some effects such as drop shadow , bevel and lights on the whole Group
Here we first Group the objects and then apply some effects such as drop shadow , bevel and lights on the whole Group
![]() This time we Package the objects and apply the same effects to Package
This time we Package the objects and apply the same effects to Package
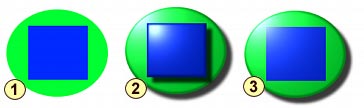
If we apply effects to a Group, each object in the group will get the new properties.
If we apply effects to a Package, the effect will be applied on top of all other effects and properties. That is, each object inside will keep its settings, yet another set of effects will be applied to them globally. It means for example that if the objects inside Package have each a different bevel we can still apply another bevel to the whole Package.
Here is an example of the idea. We created our object by simply applying 3D Ball bevel effect from the 3D Bevel properties. Now if we Package the object we can apply yet another Bevel on top of it from the same 3D Bevel properties. This time we used Saucer bevel. This gives you unlimited possibilities in applying effects.
Other difference is when you want to edit the objects inside Groups or Packages.
Package Document Color
In most cases you don't have to worry about the background color of the package document either. However in some cases a very little fringe may appear due to the antialiasing. For example if you create a Package of black objects on a white Package background and then place this package on a black background in the main document, you'll probably see a very thin light fringe around the package objects.
It's easy to fix. When you're editing the Package, just set the background color (In the Project-Size and Color) to approximate the background on which the package will be placed, in the main document.
![]() Note: It doesn't have to be a perfect match.
Note: It doesn't have to be a perfect match.