|
Menu Draft idea
There were couple of ideas about how the menus on DVD should look like.
A one of the first idea would emphasize the low-budget look. You can see it below.
This idea has a top menu that would play all episodes or go to Shows menu. In the Show menu clicking on each show will get user to the chapter menu.
The initial design was almost like drawn by pencil with boxes chaotically placed over a background. This was supposed to be animated menu, where the video in each little box will play some loop.
I didn't like this design as it was not only low-budget looking (that's fine) but also amateurish (not good). The show is low-budget and that's OK, but not amateur. I also didn't want to hassle with creating chapter menus for a simple reason, I didn't find a need to have chapter menus on shows that are less than 30 minutes each. If we have ten chapters per show, that means each chapter is about 3 minutes and we would need 12 such chapter menus for entire Season.
Jeff (the show director and producer) argued that he would like to have an easy access to the certain points of show; to jump for example to the funny mockup advertisements. This was a valid point.
Obviously a new idea come from this argument - a secret Easter egg menu that would have link to these show highlights and will also play the role of every Easter Egg - being hidden. And I can get rid of the 12 chapter menus!
 Working on the details Working on the details
From the initial draft I took the idea of the main menu. This is actually the show's title song that appears on beginning of each episode. Of course for the DVD menu I wanted to create this intro new from scratch and I did it by reusing the graphics that has been created before for the cover design.
As in the original clip, I would use the moving hills in foreground, but I will change the background to the still image of the studio set. I would then let various characters move behind the hills as a sort of paper-cut puppet parade.
I kind of like this one, because while it is new, it in fact uses various elements (including the song) right from the show.
Creating serious Motion Graphics
For creating motion graphics the most common tool is Adobe After Effects, but I didn't want to use it. I find its workplace a bit intimating and crowded. I actually enjoy the composing tools inside Sony Vegas, especially with still graphics. In fact after I learned how to use it properly I find it just perfect for this kind of animation work.
Not many people think about Sony Vegas as a composition tool, but the truth is that a huge amount of the functionality of Vegas is dedicated to composition.
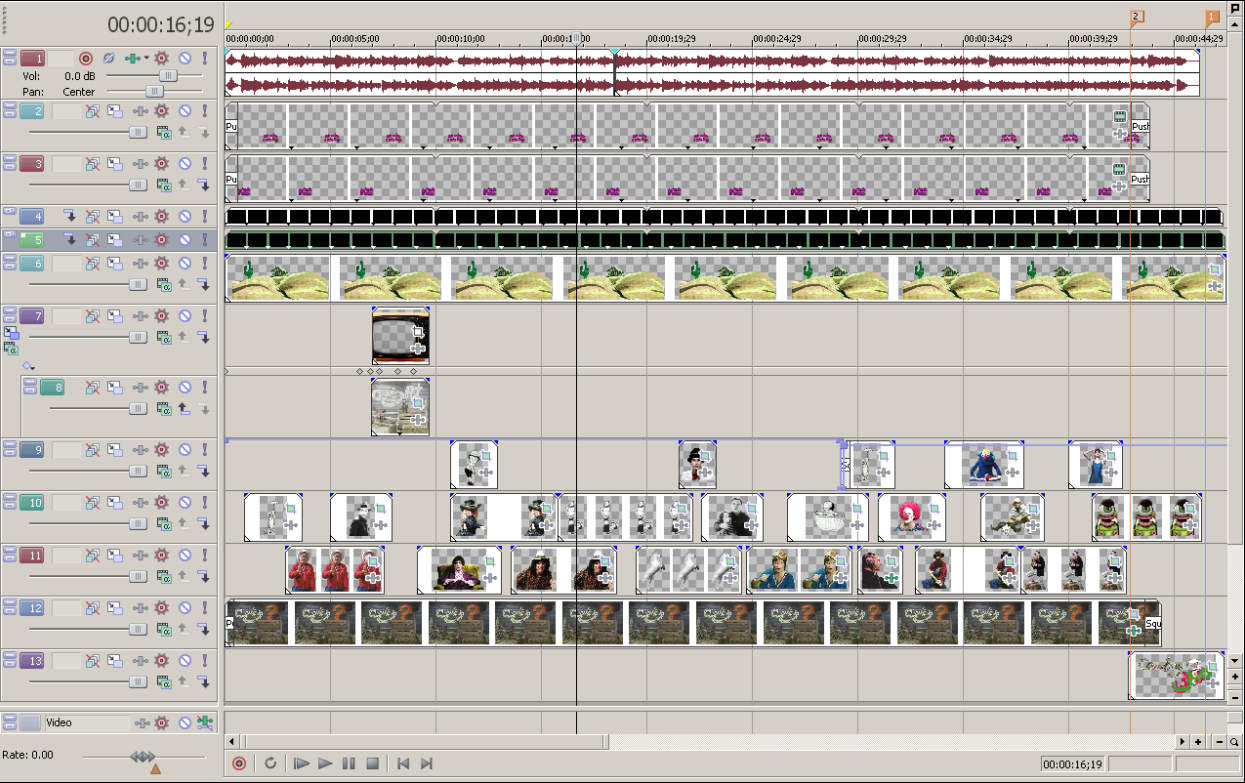
As you can see below, the title motion graphics was created all in 12 video tracks.
You can see, that the video tracks in Vegas are like layers in photoshop. The bottom ones are on the background of final video. So at the bottom (track 12) we have the still image of the studio set, then near the top are the hills in foreground. In between are numerous characters that move from left to right.
An example of the motion object.
Here I will show you a detail of one of the the more complex motion object on my menu. It uses the Composing Child with Parent Track Motion tool - a powerful, yet easy to master composing tool in Vegas.
The motion object is a TV that jumps from behind the hills and fall back. But on the TV a moving clip is also shown.
First I show the two tracks of the object.
On the Video track 7 I have a still image (png) of a TV set, that uses alpha transparency over its edges and also over the screen.
The next track below it (track 8) is the actual footage shown on that TV.
First I created a Compositing Child with the button marked as (1) on the Track 8. That will make a track 7 the parent track and the Track 8 will become a child. Any motion on parent track will be also transferred to the child.
Then I click on the Event Pan/Crop on the child Track 8 to resize it so it all fits into the TV screen of the TV set graphics
The Event Pan/Crop tool displays the actual track in relation to the screen. You see the dashed rectangle, that is our screen. You actually resize or move the screen, not the object!. If you resize the screen larger (as I did on Track 8) then obviously on the final video the actual video image will be smaller.
As you can see I resized the Track 8 so it fits into the place where is the TV screen on the Track 7. I put the Track 7 TV set here for comparison, but I don't need to change anything here.
So here I have combined an actual video with a still image and I have a playing TV set.
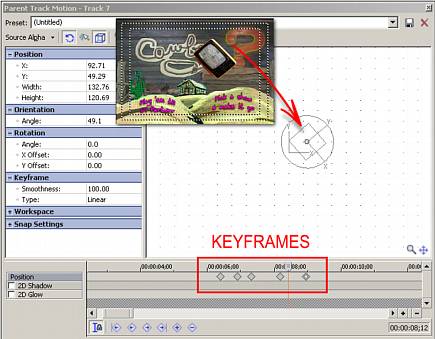
The next step (2) is to use the Parent Track Motion tool on the Parent track (track 7). Whatever I apply on the parent will be applied to the child as they are now the same object.
The Parent Track Motion is a place where I can put a Key frames on the track and resize or rotate the Parent at these key frames.
So this is where I first resize the TV to become smaller and then add keyframes so it jumps up and then down, with some small amount of rotation.
On my title menu, this is the most complex object. Everything else is just simpler. To show you how I work with the simpler images, I picked another object on track 11.
Here, I will go directly for the Pan/Crop Event
For other single objects I set the keyframes relative to the object, not to the track. Then I can later move the objects in time without disturbing its motion.
Here we see the object is set in its first keyframe just entering the screen from left bottom. The screen is the dashed rectangle with the F inside it.
|
Confusing Note: In Vegas I can put keyframes to many places. While I used Pan/Crop in first example to resize the child in relation to its parent, I didn't use any keyframes there (I didn't need the size or position against the parent change with time). But I put keyframes to change motion on the whole parent Track.
In the second example I do it differently. I put the keyframes to the Pan/Crop Event of the object itself, I don't put any keyframes to the track. Confused?
I'll try to explain.
Assigning keyframes to the object make them relative to the begining of the object. I can grab the object and move it anywhere in time and the keyframes don't change - they are glued to the object. So let's say I set my object to come from left jump a little, then exit on right. Now I can move the object anywhere else and it will still do the same: come from left, jup, exit right.
If I set keyframes to the whole track (Track Motion) then this is different. The motion is then relative to the track start (0 time) not to the object. I can place any object on that track and it will change at these precise times, but moving the object doesn't (necessary) move the keyframes with it.
I wrote word "necessary" because there is another option in Vegas called Lock Envelopes to Events and if this is ON then the keyframes set on track actually do move with the object that is over them. The keyframes will be repositioned (changing the time).
These things sounds more complex than they really are, but understanding the relationship is a key element in Vegas. Once you get grip of this, it is a breeze to create animation such as the one presented here.
|
At the end of the clip I wanted to have the menu buttons fly out of the screen and the whole scene collapse. But then if you let this menu loop it doesn't have very good loop point.
After some thinking I created two endings of the menu. One will be used in the loop of the menu and the second one will be used for the ending - when user clicks on any button on the main menu, this alternate ending will play together with the music ending.
The alternate ending will have the text buttons fly out of the screen and then finish by falling down the scene. The original ending will be used in the main menu loop. The text buttons will not move on the original ending (since this will be a distraction in the loop).
Here you can see the part of the menu rendered in a miniature video (to save the bandwidth):
Top
Previous
Next
|