|
Because we used an old TV equipment, the show was at this point all on analog Betacam tapes with a whooping 340 lines of resolution. Yippeeeee!
| Normally if we have any digital format then transfer to the computer is a simple and painless exercise with firewire connection. It can be done at home, provided that you have the right deck or camera at hand. |
With Betacam SP, being an analogue format it is a bit more complex. Forget any commercial home video capturing cards. These are more hassle than a reliable output and are happy endless source of sync issues. What you need is a good analog to DV converter. It is not so difficult to buy ADVC50 for about $200 or if you want a top of the line, get ADVC300 for about $500, both from Canopus. (Sure cheaper on ebay). You put your analog from camera to the little box and it outputs DV signal with locked audio-video sync which can be captured by any editing application. Simple and efficient.
For the capturing we actually rented a video production facility that had setup Betacam deck with analog-to-DV converter wired to a MAC with Final Cut PRO for capturing AVI in DV format. Renting a "facility" may sounds expensive, but it isn't. Such facility can be rented anywhere from $35 to $100 a day and the setup there actually works! If we would like to do the capture at home, renting a Betacam would be in fact more costly!
Each 25 minute show was captured to two AVI's with different length (depending on the best cut) for final storage. If you don't know what transfer medium you will use in the future, it is good idea to capture to AVI's smaller than 4GB so they can be carried on a FAT32 disks.
The show avi files were copied on to USB2 external 200GB Matrox hard drive. One season took about 125GB. In fact we used in total 4 of such drives for various tasks - bringing the AVIs of all seasons, storing various images, recording the MPEGs etc.
A USB2 or Firewire connection has the advantage that we can use it directly as a source in the editing application. The USB2 or Firewire is fast enough to work with the data without much delay concern. And then, since the drives are not expensive, we can just store all related materials on it and safeguard the whole drive for future reference. A DVD's with backups were also created.
Test Compression
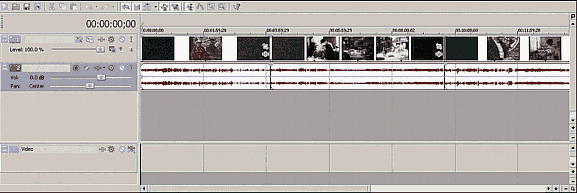
The two AVIs per show were recombined in Sony Vegas 6 and then using the Vegas Mainconcept MPEG encoder, I created first few compression tests. I started with default value, then evaluate its quality and look at the file size.

It was soon obvious that the optimum quality/size would be if each 25 minute show is under 1 GB (all with audio). Then I could easily determine the needed final space:
Total Titles: 12
Title size: < 1GB, total < 12 GB
Disk 1 - DVD9
8 Titles - < 8GB
Disk 2 - DVD5
4 Titles - < 4GB
So right now I see that for a Season 1 I need two DVD's. One would be DVD-9, the second one could be DVD-5 (which will save us few cents per DVD)
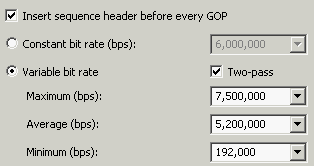
After few more compression and screen tests I settled for the MPEG-2 settings below:

This gives me about 910MB video. I will use another 35MB for audio and I still have enough space for the motion menus I am planning to prepare.
On the Advanced Video Setting TAB we used Close GOPs. This will make easier placing chapters.

I don't want to create the MPEG file with audio, as the audio will be created separately (Audio TAB)

And at last in System TAB, I want to create Elementary streams.

Color correcting and Enhancing
There is no universal magic formula for enhancing and color correcting video. Any filters that claim to do it automatically are just pulling your wallet. The truth that professionals will tell you, is that a color correcting must be done manually on a scene by scene basis. With your eyes! That require a lot of work. (and a lot of pizza) I can see various scene-by-scene problems on our footage. Some scenes are fine, while other suffer from brightness (up or down) or dullness. Because the source was a Betacam that itself come from second and sometimes third generation of copy during analog editing in the newsroom studio I shouldn't be really concerned too much about a color correcting or enhancing it any way. There is simply not enough margin in the signal I can work with. Pushing color one way will enhance problems in the signal (noise etc.) in other way and I will be stuck in endless correcting loop. Oh, and I have about 300 minutes in the Season 1 to process and we want to release it in this century.
So no further video editing was done. I simply proclaimed the picture good enough.
Audio
The original audio was at many times muddy and noisy. I want to hear clearly what the characters are saying. This is quite simple to fix. No magic plug-in is involved.
Right in the Vegas 6 I used the default build-in effects: Noise Gate, Paragraphic and track EQ, Compressor and Enhance

Noise Gate:
The noise gate will simply filter a noise from quiet passages. I set the threshold level so that when nobody is speaking and nothing else plays the Gate will cut out the background noise. That's all, because a normal speech covers the noise, the whole perception will be that there is less noise on the whole track. You have to play with the Attack and release time. Attack should be very quick so if somebody starts speaking, the Gate will immediately react (let out the sound). Release should be much longer so the Gate doesn't cut to the end of the words too sharply.
Paragraphic Equalizer
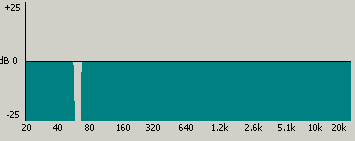
I use it for one purpose only - to remove the 60Hz hum that is present on almost all our tapes. This comes from the faulty shielding in newsroom and studio set, for example too long MIC cable pick-up the 60Hz from the nearby power cord etc. We used the Sony preset: 60 Hz hum notch using four stacked filters that does exactly this:

Track Equalizer
The classic, but still the best friend. I use the equalizer to fix the muddy sound and clear the speech.
Since our show is a talking show, our first requirement is to have audible speech.
Enhancing the high end too much also pronounces the noise so that's why I have just a "speech" bump (3). Just cutting enough before the noise kicks in. I also take the bass down as too much bass makes the speech mumbling.

Track Compressor
Compressor is the second best friend. A normal audio signal mixed from MIC has quite a large dynamic range. That is fine for music or if someone is listening on the headphones. But a speech in wide dynamic range means that one character may speak much louder or much softer than the other. Or the same character speaks normally and then says something that is barely audible. It is not always possible to take care of this during the production. A compressor is exactly the friend I need. It will compress the large dynamic scale into more narrower one which I can position to the desired volume level without the danger of too much or too little sound. Of course I can't make the dynamic range too narrow, but speech can accommodate the compression much better than a music.
Smooth/Enhancer
I use only the Enhancer part. What it does is that it creates some harmonics to our signal which makes the speech sounds abit brighter. In our EQ we did go flat after 10kHz to keep the noise down, but the Enhancer will brighten this part of spectrum without bringing up the noise. Don't go overboard with it neither.
Now I am ready to export the Audio as AC3. I used 192Kbps setting and of course Stereo. There is no reason to go any higher with Stereo Signal than 192kBps.
This creates the audio file about 35MB per episode.
While the mpeg files are being compressed, we can start preparing graphics for the DVD.
|
Additional boring technical note about source video:
MiniDV, DVCAM or DVCPRO are all the same incarnation of the DV25 format. This format has 25 Mbps data ratio. That means for 1 minute we need about 215 Mb of a free space. DV25 format uses intraframe DCT compression that is similar to a mpeg, except it is composed entirely from I-frames. Thanks to this DV25 is ideal format for editing.
Digital video uses the YUV format or more precisely Y, Cr, Cb components to store its information. The Y is a luminance or brightness. The Cr is the red chrominance and Cb is the blue chrominance. If you ask where is the green, the green information is in fact encoded in all three components. For example the Cr is a difference between intensity of red color and green color, similarly the Cb. The Y is also derived from green! So here you have the green.
Because the human eye is more sensitive to the luminance (brightness) than to color, to save storage space, digital video store more information for the Y component than to the Cr and Cb component. This is called Color subsampling.
DV25 NTSC uses 4:1:1 color subsampling. That means the color is sampled just once per four luminance samples.
PAL DV25 uses 4:2:0 color subsampling.
4:2:0 doesn't mean there are no Cb samples recorded, it means that in each line, only one color difference channel is stored with half the horizontal resolution. The channel which is stored flips each line, so the ratio is 4:2:0 for one line, 4:0:2 in the next, then 4:2:0 again, and so on. This leads to half the horizontal as well as half the vertical resolution, giving a quarter of the color resolution overall.
Digital Beta, DVCPRO 50 and Digital-S uses 4:2:2 sampling.

DVD Video use 4:2:0 color sampling.
Now if you take the NTSC 4:1:1 DV25 and convert it to 4:2:0 for a DVD the result is half color info of the already quartered 4:1:1. You get 4:1:0. That is only one eight of the original color information!
This is a strong indication to use PAL video camera for any DVD production since both PAL DV and DVD mpeg (NTSC & PAL) use the same 4:2:0 susbsampling. A good way shooting PAL for NTSC is to slow down the 25FPS to 24FPS in post processing and then use pulldown on DVD to bring it to the 29.97 FPS. This way there is no frame error or motion jitter. Many indie producers used to shoot the NTSC this way using PAL cameras. It was also very easy to transfer the PAL to the film for 24FPS cinema presentation (if one was lucky to find distributor). Today there are already some 24 FPS digital cameras from which it is easy to get NTSC (pulldown), PAL (speedup) and film transfer.
If you instead use NTSC Digital Beta or DVCPRO 50 with 4:2:2 sampling and convert it to 4:2:0 for DVD, you get 4:2:0. That has twice as much color info on the same DVD as if your source is NTSC DV25 (miniDV camera)!
HDV uses 4:2:0 subsampling, same as DVD so it is positioned well to be a source for DVD. Resizing HD down to SD for DVD distribution also further smoothes subsampling distribution. HDV on DVD looks almost always better (sharpness, color) than a DV25. However on DVD, DVCPRO 50 always outperform downconverted HDV, because of its 50 Mbps data ratio and often far superior lens. But soon a HD-DVD will be appearing, which will obviously preffer HDV as its source.
|
Top
Previous
Next
| 