About MediaChance
Products
Links


Visual Framework for Arduino

Automatically
turns a photo
into painting
inspired by
real world
artists
Dynamic image
editor and effect
processor with
absolutely
unlimited
possibilities


Enhance Dynamic
Range of your
images for Eye-
Catching results


Version 0.11 (12/10/2016)


Light, portable
Windows
Explorer-like
encryption tool
that password
protects and
encrypts any
sensitive files,
folders as well as encrypts their
file-names.
Our Software has been
featured in the Jack Howard’s
book Practical HDRI

Visual rapid development tool for creating micro GUI for arduino with LCD displays, rotary encoders and
buttons. It generate fast message based code for Arduino ATmega microprocessors.
Overview

This software is currently in early PRE-Alpha stage, more like proof of concept.
It allows you to quickly design your GUI project and then generate source code that is a great starting point of
a project for Arduino or other compatible ATmega boards.
The overal plan:
•
design whole GUI and relations between Menus, screens, data entry screens etc..
•
support most common LCD displays
•
support rotary encoders, buttons, keypads etc…
•
support for other hardware such as RTC, …
•
add code blocks
Current Status
Version 0.11 shows a general working direction and the concept. You can already design basic menus and
screens flow, then generate the code.
The version will generate code for:
•
16x02 LCD display with I2C backpack (the most common type)
•
rotary encoder, both 1 pulse per detent and 2 pulses per detent are supported
•
buttons
While you can switch the LCD to the larger 40x02 display there is not yet code for that.
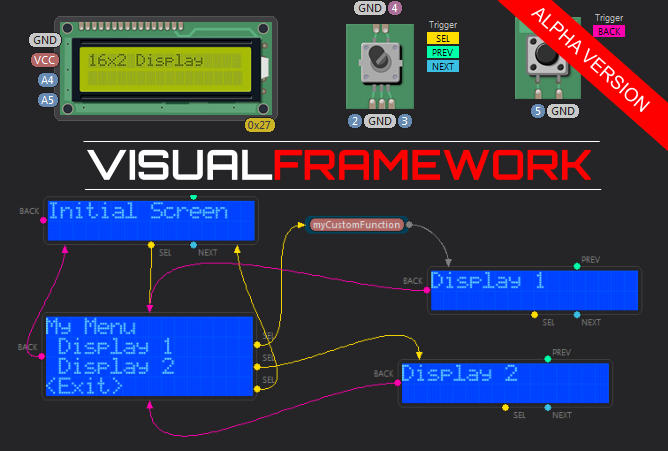
Short Guide and explanation of the concept
The designer interface and logic is based on
the Photo-Reactor as a node based editor.
You drag items on the “canvas” then connect
their outputs to another item.
Since this is a response-action based GUI
system, the connections are “triggers”: for
example pressing a button will generate SEL
trigger or turning the rotary encoder
generates either NEXT or PREV trigger.
You do not actually connect hardware items
such as monitor, button or rotary encoder,
you only place them on the canvas and set
their properties so the system understands
what hardware make those triggers.
(Click to Enlarge)
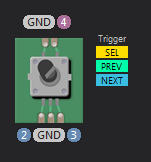
For example dragging rotary encoder will automatically create the hardware connections and shows it uses PINS 2,3 and
4 (later there can be a hardware connection view that will help you to easily connect the items to arduino visually)
Then it also shows you what triggers this hardware can generate: it shows SEL, PREV and NEXT
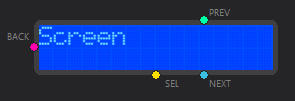
Now if we add a software block - Screen for example, it shows that it can
potentially respond to all 4 currently supported triggers BACK, SEL,
PREV and NEXT. That means while this display is ON user can click the
rotary button or scroll it one or another direction and the program then
can go where we connect those trigger pins.
It is important to mention that the whole generated code is 100% non-blocking so as the screen “waits” for your input, the program loop executes
as usual (so your arduino can measure, test etc…). More, the screen will in fact use smart code where it sends lines to the display only when
needed so it doesn’t waste any cycles from the loop (it is common mistake to continuously redraw the display with the same thing which slow
down other responses).
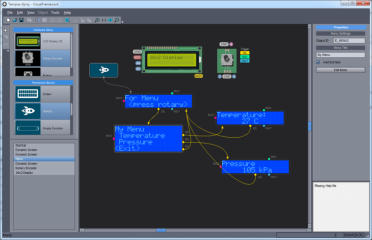
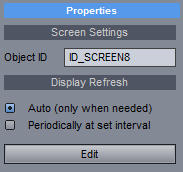
Now lets look at the screen object options (right side of the screen), it shows few things that are properties of the
object. First is the Object ID. This is important unique handle of the object. So for example in the code if I want to
manually display this object at any time all I need to do is to just call VF_DisplayObject(ID_SCREEN8);
Next option is Display refresh, it can be automatic so it will refresh the display only when there is an change - this is
good for a typical static screen.
We can anytime refresh display manually from the code if we need that by calling VF_Invalidate();
Periodically at set interval will refresh the display every set amount (in milliseconds). This is good option if we are
displaying constantly changing data (temperature, time etc…). Having an interval avoids the common mistake of
junior programmers: displaying and measuring live data as fast as possible in a loop (ATMega 328 runs on 16MHz!)
which slows down everything else to the crawl.
Coding benefits of Visual Framework
•
100% Non-blocking code; displaying things will not stop execution of your program
•
Smart refresh of displays; display refreshes only when needed so it doesn’t waste cycles by repeated
displaying of the same things
•
the framework is message based (similar concept as in a big operating systems) that produces very
lightweight and responsive code
•
unlike other micro GUI frameworks that holds the structure in dynamically allocated arrays, the VF
generated code is static, with almost no RAM footprint (ATmega328 has only 2kb of RAM)
So let’s say we want to go to the menu from this screen when user press the rotary
encoder. All we need to do is to add the menu, then connect the Screen with the menu.
This is done exactly the same way as in Photo-Reactor by simply clicking on the trigger
pin (in this case yellow circle SEL) and dragging the line to the menu while holding the
mouse button down.
We can see the menu does respond to SEL and BACK triggers. There is no NEXT or
PREV triggers, because those are handled internally by the menu code for moving
between items, we don’t have to worry about that. Each item SEL trigger can do some
action for example go to another menu, go to screen, call a function etc….
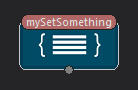
There is a simple provision for calling functions by using the Empty Function block or a
Code block. (Both do the same thing right now). Function blocks have one special PIN
which is unnamed, but it is a pass through pin, this is where you
will end up when the function returns. So we can connect SEL pin
from a menu item to this function and then from the function to
another screen, menu or just go back to some initial screen.
This will give us in the final code a distinctive function named
exactly as we set in the object properties mySetSomething() where we can add stuff we want to do.
Message Based System
It is probably time to mention that the Visual Framework uses a micro message based system to go to a display object after a trigger; a similar
concept is used in big operating systems. So pressing a button will not directly call a “display_screen()” function, it will fire a message (the Object
ID of the screen) and then the screen will show up at its proper time when it is free to do so. This has many benefits; it produces ultra light code
that feels “fast” because everything has its proper time and proper structure. (you do display code IN display function, not everywhere you want)
It also frees programmers from bad habits such as putting purposeful delays in the code.

Currently developed objects in this version
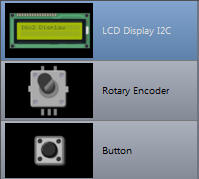
LCD display , the most common 1602 or 4004 with I2C (yes the one from ebay). This object can be switched
to the large 4004 (4 line display) but currently the VF doesn’t support it yet in v 0.1. You can also set I2C
address in the properties.
Rotary Encoder. This will automatically set interrupts on pin 2 and 3 for smooth and super responsive ride. The
switch pin will be always on 4. The properties can be used to set 1 click per pulse (such as 12P/12D) or 2
clicks per pulse (such as 15P30D). Also you can specify that the encoder has already internal pullup resistors.
Simple run of the mill button. The code will handle all the debouncing and triggering for you, you just specify
which trigger the button “triggers” and on which pin it is. The code will also check for clashes such as using two
buttons with different function on the same pin, or clash with encoder etc..)
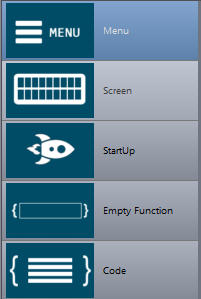
The screen can update either automatically or in set interval. It generates a function for your screen display
code in INO file with some basic text handling examples that you can replace with your own. The interval can
be set directly in the generated code
This object will tell which display object should appear first (without it, it would be the one you add first)
Will generate a function in your code that will be called from the trigger action. For example pressing Select
button in your menu can first call your function, then go to another menu or screen.
This is the same as above. In future this block will allow the user to add code directly in designer using some
sort of visual designer (I had similar thing in DVD-lab where you could design your VM commands visually- so
something like this)
Commands you can use in your code
VF_Invalidate()
Anytime you call this the currently displayed screen will be refreshed. For example you may have test for a
voltage on analogue pin, putting it in a variable and then display that variable on a screen. Instead of displaying
the screen at certain intervals, you may simply call the VF_Invalidate only when a change occurs (for example
after you average it for 10 loop cycles)
VF_DisplayObject(int nObjectID)
You can switch to displaying an object (currently screen or menu) at any time from your code
without the need for a trigger by simply calling this with the Object ID of that particular object. (The
ID’s are listed in objectIDs.h generated file or they are shown in the designer)
So for example if a special voltage threshold occurs on analogue inputs, you may simply call a
screen to show its value, warning etc…
The framework tries to be very simple and transparent to the end user
bool VF_NeedRefresh()
bool VF_RefreshTimer(long nMs)
bool VF_TimerExpired(long nMs)
VF_CleanLineBuffer(int nL)
Helper functions to be used in your custom Screen Display function. The code generated in the INO
file when you add Screen has explanation how to properly use each of those functions.
These functions will avoid unnecessary redrawing of the display that takes cycles out of the
important parts of your sketch.
VF_SETUP();
The framework designer will generate a very clear looking INO file. This is how the VF is integrated to your project
VF_SETUP() is always used in the void setup() function and creates the LCD display, rotary
encoder and buttons objects. It should be first line in the setup()
VF_LOOP();
VF_LOOP() is always used in the void loop() function and this is the single function that handles
everything from checking the buttons to redirecting what needs to be displayed and calling the
proper functions back. It is non-blocking so it always returns back as soon as possible and your loop
can continue
This project is Work in Progress.
Any ideas, comments, code fixes are welcome.
This code uses some third party libraries under creative commons license:
LCD, I2CIO and LiquidCrystal_I2C by Francisco Malpartida
Button by Alexander Brevig
Rotary state machine by Ben Buxton
All other code is by R.Voska (Mediachance)
Next Planned Enhancements
• adding code for 4004 LCD
• adding various data entry screens
• adding text entry screen
• adding timer object
• …
Changelog
Version. 0.11
• Generates also Visual Studio Project for Visual Micro
• Removed VF_ClearDisplay and shuffled few things around in the library for better flow and future enhancements
• Added option for screen to display data for certain time then continue somewhere else
FAQ
Is it open source?
No, not at this moment. In order to build the app quickly without writing a lot of new code for which I don’t have time, I re-purposed the Photo-
Reactor software, which itself uses some third party libraries… but maybe one day when the framework is stable a new open source designer
can be build, from specifications, (preferably by someone else). The GUI and the framework are two independent entities, the GUI uses the
code template to build the source code.
Subscribe to stay notified about new releases, discount offers and
get instantly 10% off your first order!
Version 0.11
Download Pre-Alpha Version
Subscribe to stay Notified
(and Get 10% off all Mediachance products)
This is a working pre-Alpha version
(mostly a proof of concept at this stage) not a finished product.
![[x]](index_html_files/close.png "Close")