|
Brush Settings |
  
|
|
Brush Settings |
|
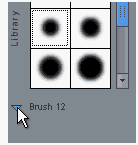
You can reveal the Brush Settings menu by clicking on a small arrow at the bottom of the Brush bar.
|
|
Click on the small arrow on the bottom of Brush Bar. |
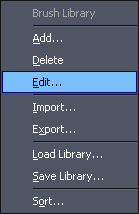
The Brush Settings menu will appear. |
Add
Add a new brush. For more info about creating a new brush see Brush Properties.
Delete
Delete currently selected brush from the Brush Library. (That's the set of brushes you see)
Edit
Edit the Brush Properties.
Import / Export
Import or export one brush from/to current Library. The brush has extension *.br1
You can use Export and Import if you (for example) want to move or copy a brush from one Library into another.
Load / Save Library
This loads or saves the *.brs library. Brush Library is a set of Brushes grouped into one library. Each Tool - for example Image Nozzle - can have more than one Library. In the case of Image Nozzle, think about sets with different group of brushes - Nature, Technology etc...
To make a library available for particular tool you have to save it in the directory Brushes under the tool sub-directory - in the case of Image Nozzle it is in "nozzle" sub-directory. Then you can browse forward and backward through the Libraries from the Brush Bar with the small up and down arrow on the left side.
Sort
Sort the brushes in the library. For example, you would like to have brushes you use the most on the top etc... You can also change a name of the brush here.
Creating your own library
Each Tool has its own set of Libraries, they are in the subdirectories for a particular tool. To move between sub-libraries you use the Library Browser arrows (Small arrows on the left side of the Brushes Library)

If you want to add a new library into the set for any Tool, you can just copy an empty .brs file from the Brushes folder into any of the Subfolders. This will create a new library set.