|
Toolbars & Panes Overview |
  
|
|
Toolbars & Panes Overview |
|
Edit Tools
The toolbar at the top of Photo-Brush gives you tools for File, Copy, Paste, Zoom, Floater, Text, Crop, Resize and Enhance
![]()
Here you will find:
New, Open (arrow shows enhanced Open options)*, Save (arrow shows Enhanced Save options)* see below.
Copy, Paste - more Copy/paste options in the menu Edit.
Undo / Redo - Return to previous step.
Hold and Lock Undo - Holds current image in the Undo buffer until this button is pressed. See more in the Eraser section.
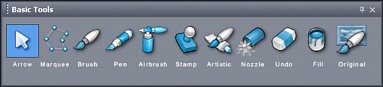
Basic Tools
| • | Image Browser - Quick thumbnail file browser |
| • | Zoom Percentage, |
| • | 1:1 - zoom to the original size (one pixel on image is one pixel on monitor) |
| • | Fit to window - Zoom the image out to fit in the editing window |
| • | Zoom In and Out - Zooms 20% plus or minus |
| • | Arrow - the tool for resizing Floaters, Cropping, or moving Text |
| • | Magnifying Lens - zoom into the rectangle you draw. |
| • | Hand - Moves the image in the window (pan) |
| • | Text tool - Add text to the image |
| • | Selection/Floater - Creates a Floater - a part of the image floating over the image. To paste the floater permanently to the image press Enter or double click on it. |
| • | Crop - draw a crop rectangle, then press Enter or double click on it to crop the image to the size of the rectangle |
| • | Proportional Crop - the crop rectangle will keep the user selected proportion, for example 7:5. |
| • | Resize - resize the image to the desired pixel size. |
| • | Auto Enhance - one-click automatic color and dynamic range corrections on the image. |
Brush Tool Pane
Paint Brush, Pen, Air Brush - basic brushes for drawing.
Rubber Stamp - Great tool for cloning one part of the image into another part, or another image. Great for adding or removing part of the image.
Artistic, natural & 3D brushes - a special set of brushes simulating artistic and natural painting (Oil paint, Impressionists etc..) and various 3D brushes (rope, 3D tube, etc..)
Image Nozzle - Sprays a series of images
Undo - By painting with undo tool undone the last changes on painted strokes.
Fill (Paint Bucket) - Fill up the whole area with the background color and / or a selected texture.
Original - Paint the original (background layer) over the painted strokes.
Photo Retouch - A set of brushes for various photo retouching - painting contrast, sharpen, blur, lighten or darken, colorize, remove red eye or clean skin etc....
Special Effects - A set of brushes and tools for special effects - Emboss, Aged Photo, Warping, adding lens flare, sparkles etc....
Color & Texture Pane
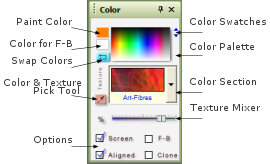
See the full detailed description in the Color & Texture section.
Brushes Pane
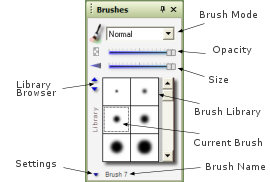
See the full detailed description in the Brushes section.
Camera Info Pane
EXIF information
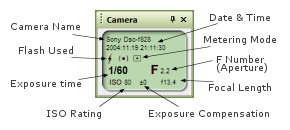
If you load a JPG image which was taken with a digital camera, this display will inform you about the camera settings for the shot.
You will find all important information here. By clicking on the window you will get detailed information about all available parameters of the camera.
On the display you could see: The name of the camera, date and time when the shot was made, if a flash was used, the metering system (average, center weighted, spot), the exposure time (shutter speed), the ISO rating, Exposure Compensation, Focal length and F Number (aperture). Note that F number and Exposure Time can be directly supplied by the camera EXIF info (like in Canon S10) or it will be calculated from Aperture and Shutter speed (for example Minolta Dimage7)
Icons:
![]()
From the left to right:
Flash, Center-Weighted metering, Spot metering, Average metering.
Your camera may not support all types of metering.
These are very valuable data, because you can, for example, learn which camera settings work best for each type of shot.
Your camera may not support all the data.
If you don't see this window:
- the image you loaded wasn't taken with a digital camera
- the image is from digital camera, but your camera doesn't write the information into the JPG file (some of the old ones don't)
- the image was processed with an image editor which doesn't save the camera information back to the file.
You can switch off this option in the Settings.
Note: Photo-Brush will also automatically save the EXIF data back to the JPG file.
35mm Equivalent
(Menu - Tools)
This will calculate the CCD size from Exif Info and then show an 35 mm camera Equivalent of Focal length.
For example Canon PowerShot S10 has the CCD size 6.24x4.68 mm that means this camera default Focal length of 7.5 mm gives you the same "zoom" as 43.7 mm in 35 mm camera. This is good to know because many people understand the focal length in 35mm cameras. For example you can imagine an 35 mm image taken with zoom lens "300". However each digital camera has different CCD size so the Focal Length tells you nothing you can relate to- for example what is 52mm?
In fact with the Powershot CCD size the 52 mm would give you the same zoom as 300mm in 35mm format! If the basic Focal length (unzoomed) is 7.5 mm this means you would need 7x optical zoom to get there. (of course most of the cameras have 2x or 3x zoom)
Some cameras such as Sony Cybershot doesn't show their CCD size in the Exif data. In this case the 35mm equivalent can't be calculated so the tool is grayed out in the menu.
Enhanced option menus for Open and Save
Clicking the arrow beside Open and Save buttons will bring a special menu which enhanced open and save functionality
Open:
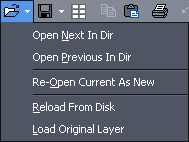
Open Next in Dir & Open previous in Dir
If a current image is loaded from disk (or it has been recently saved to the disk) these commands will quickly load next or previous image in the same directory as a current image. This has obvious benefits of loading next image without going into Open dialog box.
Re-Open Current as New
This will open the current document from disk, however it will name it as a new document (Image1..).
For example we open image: mypicture.jpg and change colors. Before we save it back we would like to compare it with the original image on disk. All we need is to use Re-Open as new. The original mypicture.jpg will be loaded directly from disk and placed as a new document - so we can compare these two images or perhaps try different correction on the new image.
Reload From Disk
This will simply reload the current document from disk and all what wasn't saved will be lost. Ideal if we need to start again.
When you load image the original stays unchanged in Original Layer - so we can bring back changes with Original Brush. Load Original Layer will let us to load any image from disk into the Original layer then use Original Brush. This we can repeat many times.
Example1: We changed image mypict.jpg certain way, then save it into new file changed.jpg. We can still use Original Brush to change areas back to original. However the next day we decide that we need to bring some of the original back so we load changed.jpg. Of course since we load it from disk the Original is now what we saved the previous day. Instead of redoing it or cloning from mypict.jpg we simply load changed.jpg then use Load Original Layer to load mypict.jpg. Now we can use Original brush again to paint in areas we need to return back to original.
Example2: We load one image1 then load another image2 as original and use Original Brush to brush image2 into image1. Now we can load image3 as original and brush that into our composite....
Save
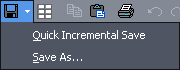
Quick Incremental Save
A fast way how to quickly save current image into disk (without going to Save dialog) however without overwriting the original image.
For example we are working on image portrait.jpg and do some changes. Then we use Quick Incremental Save the current image will be saved as portrait-1.jpg. Then we can make another changes and use QIS, the image will be saved as portrait-2.jpg.
This way we can simply create series of images on disk without any need to go to Save disk or worrying about overwriting something else.
The QIS will always make sure that it doesn't overwrite any file. If for example portrait-2.jpg already exist it will simply continue with incrementing and save the image as portrait-3.jpg or whatever is not yet used.
Note: the image will be saved in the same format as the current image. If we are working on png image the incremental files will be also png.
For jpg images the last used quality setting will be applied without asking. That means if you are not sure it is always better to check what jpg setting we have by simply using Save As before you do QIS.
Tab Bar
A Tab Bar appear on the top of the screen if two or more images are opened. With the Tab Bar you can easily switch between images during editing. Right clicking on a tab will open a menu with common items such as Save, Close, Open Next, Copy etc. If there is open too many images and the project tabs cannot fit to screen, you can use tab slider to slide the tabs (to left or right). The tab slider is inaccessible if there is no need to slide the tabs (there is still space for new tabs).
![]()