|
Settings |
  
|
|
Settings |
|
Menu: "Tools"-"Settings"
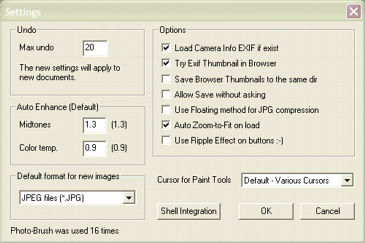
Undo - Here you can specify the number of Undo steps.
Warning: The Undo buffers are in the memory, so if you have enough memory, and you are working on small documents, you can eventually increase the number of undos.
However, it is not recommended - it could lead to slowing down of the software or even crashes when all the memory is gone. Photo-Brush 1.2 and newer saves larger undo files to disk.
If you want to know how much memory you have, you only need to look at the right bottom corner of the Photo-Brush window.
![]()
If the number is close to zero, you are headed for trouble. Save what you can, close documents, and decrease the number of undo steps.
In case of very large documents, you may even want to put 0, no undo. This could save a lot of memory.
Show Camera EXIF Info
If you load a JPG image, which was taken by digital camera, Photo-Brush will display EXIF information in a Camera Info Bar.
Some older cameras may not support EXIF data - in this case the Camera Info will not show.
Read more here:
Try Exif Thumbnail in Browser
This is related to Image Browser only. If checked, the Browser first looks into the EXIF for a thumbnail. If nothing is found, then a new one is created.
Save Browser Thumbnails to the same dir
This is related to Image Browser only. If checked, the Browser will save thumbnails to the same directory as the source images. This may be not desired so unchecking it will save the thumbnails into a temporary space.
Allow Save without asking
Normally Photo-Brush always asks when you click the save button (it works like Save As...). The reason is to prevent new users from overwriting original images. Some users, however, prefer the standard "Save" command- (no prompting) - if this is your preference, then check this option ON. (For advanced users)
Auto Enhance (Default)
This allows you to change the coefficients for Auto Enhance procedure. There are just two which can be adjusted:
Midtones - adjusts midtones. (recommended values 1.0 -1.4, higher number makes lighter image, default 1.3)
Color temp.- adjusts color temperature. Values below 1.0 will make the image warmer, above 1.0 colder. (recommended values 0.85 -1.15, default 0.9 )
Use Floating point method for JPG compression
By default (OFF) Photo-Brush uses an Integer algorithm for saving JPG images. The reason for this is that it produces the same quality on any computer using any processor. Use of the floating point algorithm is processor dependent. Strictly controlled by logic, floating point should produce the best quality - but you never know these days. Each processor uses floating point operations differently. In a processor with fast floating point calculation, this method may even be faster than the integer algorithm. Try it, but you probably won’t see any differences with the naked eye.
Auto Zoom-to-fit on load
When selected, the loaded image will be automatically zoomed out to fit in the window.
Use Ripple Effects on Buttons
That’s just an Eye-Candy... Set it On and then click on any brush button on the main left vertical toolbar...yes we have nothing better to do :-)
Cursors for Paint Tools
You can select what cursor the software will use during painting:
Default (Various cursors) - each tool will have its own small cursor (like a brush, pen or stamp);
Cross-hair or Small Cross - all tools will share this cross hair type of cursor which is easier to see behind.
Show Tab Bar for x or more open images
This will show a Tab Bar on the top of the screen for easier switching between images when number images is the specified number and more. Default 2 - this will show the Tab Bar only if you open 2 or more images.
![]()
If you want to have the tab bar always present put 0. If you don't want to have the tab bar at all put hight number such as 100.
Default Format for new images
When you create a new document, or scan image there is not yet associated file format. When you press save you will be, as usual, given a list of format to save. What you set in this option will be the default format - offered first. If you scan a lot images this will save you some mouse clicking. Two most used formats as default are available - jpg and png.
Shell Association and “Edit with Photo-Brush” Shell Integration
Menu Tools->Shell Integration or Button Shell Integration in Settings.
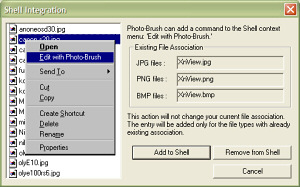
Photo-Brush can add a new entry into the Shell context menu: Edit with Photo-Brush.
It could be added for JPG, PNG or BMP files.
This action will not change the file association you already have (when you double click on the image in Explorer). You usually have these file types registered (associated) with some image viewer or Internet Explorer.
Pressing the Add to Shell button will add a new entry into the shell context menu. Then whenever you see a JPG, BMP or PNG image in the Explorer, you can click on it with right mouse button to open the shell context menu and then select “Edit with Photo-Brush” item to open this file in Photo-Brush.
Things to remember:
| • | Photo-Brush needs you to have the file types associated with some program. (That is, if you doubleclick on them in Windows Explorer, they will open in an associated program) By default this may be Internet Explorer or some other image viewer you installed. |
The dialog will show you if the file is associated or “none” if it isn’t. If there is no association, for example for JPG, you can create one very easily: Close this dialog, then go to Windows Explorer and double click on any JPG file you have on your hard disk. Windows will pop-up the Open With dialog box. Now select a program you want to associate with this file (for example, Internet Explorer or Photo-Brush if you want) then check the “Always use this program to open this file” and click Ok. If you ever wish to change the file association later, go to Explorer, menu View - Folder Options, then click File Type tab. It is advised that you read the Windows help file concerning file associations before you start making changes there.
| • | If you added the Photo-Brush extension to the shell and then later you wish to uninstall Photo-Brush, you need to remove the shell integration before you do the uninstallation. Just go to this dialog box again and click Remove from Shell button. |