Smart way of changing aspect ratio for DVD-menu still images or digital photography. ReAspect is our "secret" internal tool made available for public.
ReAspect is a very straightforward, stand-alone software. Load image, then adjust the few settings until the image looks fine, then save it.
ReAspect
![]()
Overview
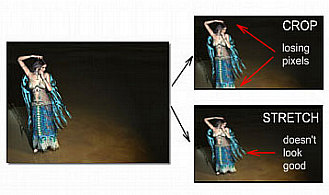
Sometimes you have a great looking background image in 4:3 and you want to create a 16:9 version of it.
Neither will work very good and here is why:
Cropping: you are losing part of the image and resolution. If the original image had 480 lines, after cropping it to 16:9 you will have only 360 lines, but more importantly part of the visible image is lost.
Stretching: If you stretch the image, then you are reusing all the pixels, but the result has incorrect aspect ratio - image looks "fat".
You can also try to mix these two - partially crop and partially stretch the image but you always loose either the pixels or the look.
Can we do it without loosing a single pixel,
yet keeping the correct aspect ratio?
For converting large number of 4:3 images to
widescreen we had to create some quick, but high
quality mechanism that would reuse all the
pixels.
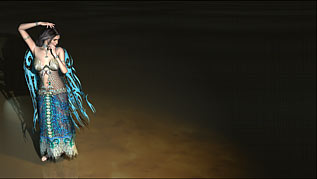 The
right 16:9 image was created from the 4:3
source. As you can see, we didn't loose any
image or resolution from the original. So how
did we did it?
The
right 16:9 image was created from the 4:3
source. As you can see, we didn't loose any
image or resolution from the original. So how
did we did it?
Dynamic effects
DVD-lab and DVD-lab PRO has strong integrated
menu designer with multiple Undo/Redo.
DVD-lab PRO adds also new
DynamicFX textures that can be animated for
Motion menus.
Non-Uniform Gradual stretching
We created a special non-uniform gradual
high-quality stretching algorithm. This is
something that no other image editing
application has so we had to build a new tool
for it. With ReAspect you can gradually stretch
(or pull) only certain part of the image while
keeping the important part intact.
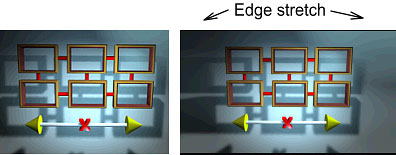
Of course not all images have the main character on one side. For images with focus on center you can for example stretch only edges.
Other use
While the primary goal for the tool is to
change aspect of typical menu images, it can be
also used to some extent on a digital
photography. Of course normally there isn't big
need for 16:9 photography outside the slideshows
on DVD and video and most of the time we can get
away with cropping.
How it works
ReAspect is a very straightforward, stand-alone software. Load image, then adjust the few settings until the image looks fine, then save it.
The first setting is the aspect conversion. Here we tell the software the type of conversion we want to perform.
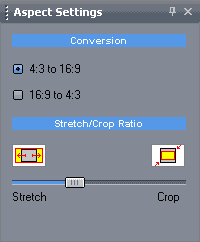
The main task is of course 4:3 to 16:9 conversion. The complimentary 16:9 to 4:3 conversion is here for our convenience because to create 4:3 image from widescreen is a simple no-brainer crop operation.
The second settings is a Stretch/Crop ratio slider. This not only gives you the ability to choose between stretching and cropping the image, but it allows you to smoothly mix these two operations. Adding more cropping will allow for less stretching. (For images where full stretch is too much)
Stretch Settings
The heart of ReAspect is its non-uniform gradual stretching algorithm. The amount of stretch is determined by the Stretch/Crop slider and the algorithm is determined by the Stretch Settings.
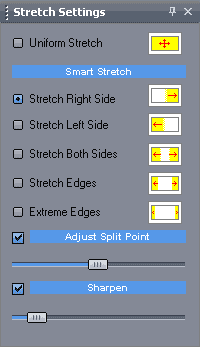
First setting is Uniform Stretch. This is a simple image stretching as it is typical in any image editing application.
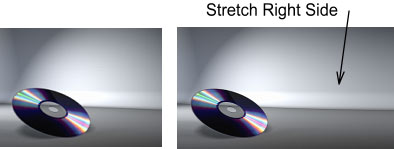
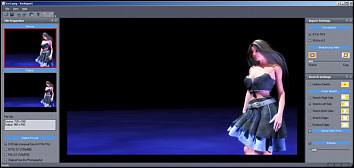
The rest are various non-uniform and gradual stretching where you can determine which part of image will be stretched. For example for the image of dancer on the top of this page we used Stretch Right Side, which will preserve the left side (with the dancer).
You can manually adjust the split point. For example the Stretch Right Side will gradually start stretching the right side from center of the image. If this is too close to your focus point, you can adjust the Split Point by moving the slider - which will start stretching the image earlier (left of) or later (right of) from the center.
Last setting is the Sharpen. This enables the Unsharp Mask Filter (also known as Gaussian Sharpening).
Output Format
On the left side you can set the output format.
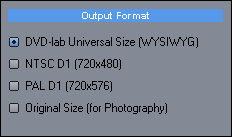
When you save the image, it can be saved using different sizes.
The first is DVD-lab Universal Size.
This is the WYSIWYG format DVD-lab uses for both
PAL and NTSC systems. The 16:9 image will be
always sized to 960x540. This is the best format
if you work with DVD-lab and it apply for both
PAL and NTSC. You should also use this format if
you want to edit the image later in Image
editing application since the aspect of the
image is set for viewing on computer monitor.
Then after editing you can resize the image to
NTSC or PAL size in any editing application.
If you need to create pre-formatted image for
NTSC (720x480) or PAL (720x576) right away, you
can select the second or third option. This will
not change the view on the screen, just the
image when it will be saved will be resized to
this size. Such saved image when later viewed on
your computer monitor will not look correct!
However when this file is used directly in a DVD
authoring application the result will look
correct on a TV. This is because DVD use
rectangular pixels, while PC uses square.
The last option is for Photography. The result
size will be determined by the size of source.
If for example the source is 1600x1200 the
result stretched to 16:9 will be 2133x1200. (It
will be smaller if you use Stretch/Crop slider,
to avoid any vertical resizing).
System Requirements
Minimum System Requirements
- Microsoft® Windows® 7, Vista or XP (32-bit or 64-bit editions)
- 1 GHz processor or better
- 2 GB of RAM
- 1 GB of free disk space
- Minimum screen resolution: 1024 x 768 (highly recommended higher resolution)

Free Trial
May we suggest?

Bundle
Get the ES suite that includes DVD-lab PRO2 and EditStudio in one bundle.